Online store provides PCI-DSS Level 1 validated, easy-to-use and powerful ecommerce plugins for WordPress.ORG
WordPress.ORG is fully-customizable software that you can download and install to your web hosting. Started as just a blogging system, WordPress has evolved to be a full content management system with thousands of plugins, widgets and themes.
- Adding the store to WordPress.org
- Adding the store to other pages
- How to add one product to the page
- How to set up the store
- How to manage the store
- FAQ
- Is Online Shopping Cart plugin secure?
- How to show different store categories on different pages?
- How to display the store on the site homepage?
- Download the plugin
Adding the store to WordPress.org
If you run your website or blog on the self-hosted WordPress.org platform, you can easily add Online to it by installing Online store plugin (see attachment)
- Download your WordPress Plugin to your desktop from attachment.
- Open your WordPress Admin area and navigate to Plugins → Add New → Upload plugin
- Go to Plugins screen and find the newly uploaded Plugin in the list.
- Click Activate to activate it.
Now you can connect your Online store profile with the plugin.
- In the side menu navigate to Online store Store → Setup.
- Click Connect to assign existing store to this account. It will direct you to your Online store account where you can provide the required permissions.
- Now there is a new Store page on your website, where your online store resides.
Adding the store to other pages
When you have installed Online store plugin, you can easily embed your store to other pages of your blog.
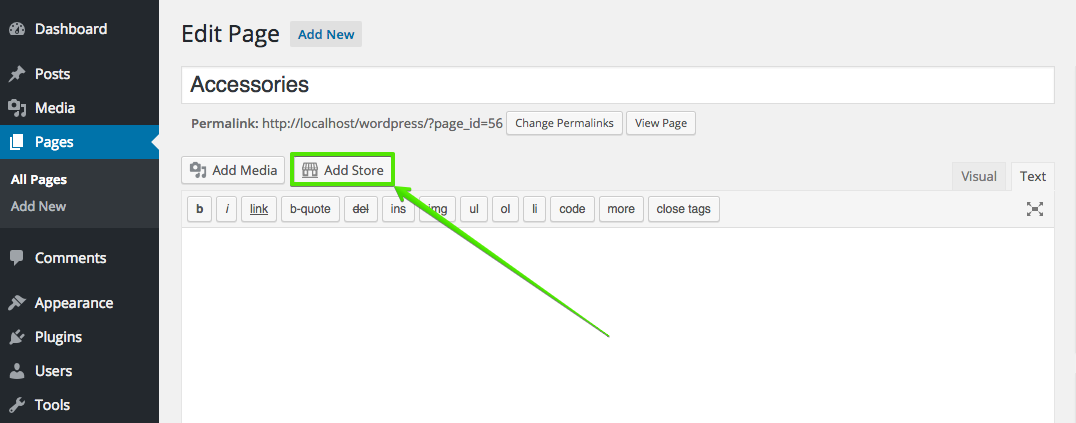
- In your WordPress Admin panel navigate to the page where you want the store to appear.
- Click the Add store button above the text editor area.
- Select the widgets you want to display on the page: search bar, minicart, categories. The main product browser widget will be displayed by default.
- Switch to the Appearance tab in the sidebar to edit the layout of the store. You can control how many items will be displayed in grid, list and table views, select the category that you want to show when the store loads on the page, define the default view of product listings and search results.
- When you have selected all the needed options, click Insert into page.
- In Text area you will see a so-called shortcode that will render the store, when the page is published.
- Additionally you can control the layout of the shopping bag widget by changing ‘minicart_layout’ parameter in the shortcode. Supported values are:
- ‘attachToCategories’ will display the shopping bag attached to the horizontal menu,
- ‘floating’ will display the shopping bag floating over the page,
- ‘Mini’ will display the shopping bag in compact view,
- ‘MiniAttachToProductBrowser’ will display the shopping bag in compact view attached to products.
How to add one product to the page
If you have one or just a few products in your store, you can add them to the blog pages individually instead of installing the whole product catalog.
- Make sure, you have installed Online store plugin for WordPress.
- In your WordPress Admin panel navigate to the page where you want the product to appear.
- Click the Add product button above the text editor area.
- Select the product you want to display on the page from the list or search it by title or SKU number.
- Switch to the Customize Widget tab in the side menu. Here you can select the product properties that you want to display: product image, title, price, the list of product options, the quantity field and the Add to bag button.
- Additionally you can choose to display the price on the Buy Now button, to show a border around the product entry and to center align the entry on the page.
- When you have chosen all the options you want, click Insert to add this item to the blog page. In the Text area you will see a special shortcode, similar to:
The shortcode will render the product when the page is published.
How to set up the store
When Shopping Cart is installed to your WordPress backend, it automatically creates a Store page and adds the store to it with default settings. You can easily change the store layout and display settings, if needed.
Store elements and appearance
- Start by opening Pages in the side menu and clicking the Edit link below the Store page.
- Click the Edit store button.
- Under Store elements you can select which widgets you want to display on the page: search bar, minicart and categories. The main product browser widget is displayed by default.
- Under Appearance you can control how many items will be displayed in grid, list and table views, select the category that you want to show when the store loads on the page, define the default view of product listings and search results.
Sidebar widgets
Online Shopping Cart plugin allows you to add the store elements to the sidebar area of your WordPress website to make the store more visible and easy to access.
To manage the sidebar widgets, navigate to Appearance → Widgets in WordPress Dashboard. There you can activate the following widgets:
- Shopping cart
- Shopping cart (mini)
- Shopping cart (floating)
- Product search
- Store root categories
- Store page link
- Recently viewed products
Store menu
With the Shopping Cart plugin you can add links to the store elements to the main menu of your WordPress website, so that your customers could easily navigate to the store and category pages, access their store profile and open the shopping bag.
To add the store menu go to Appearance → Menus in your WordPress Dashboard. Click Store to expand the drop-down list. There you can select:
- Cart: adds a link to the Shopping bag,
- Product Search: adds a link to the page with the search results,
- My Account: adds a link to customer profile page,
- Store: adds a link to the main store page,
- Store with Categories Menu: adds a drop-down with the store root categories.
How to manage the store
The Online Shopping Cart plugin allows to manage your store inside WordPress Admin Panel.
- You can access the full store backend, if you navigate to Online Store → Dashboard.
- To view and manage the orders, switch to Online Store → Sales.
- Under Online Store → Products you can work with your catalog.
Alternatively, you can open Online store Control Panel directly via https://my.shopsettings.com/ or inside mobile applications for iOS and Android.
FAQ
Is Online Shopping Cart plugin secure?
We pay maximum attention to the security in Online Store. Keeping the sensitive data of our merchants and customers safe is our highest priority.
Online store is PCI DSS validated Level 1 Service Provider which is the gold standard for e-commerce solutions worldwide.
The Payment Card Industry Data Security Standard (PCI DSS) is a set of security standards developed by Visa, MasterCard, American Express, Discover and JCB credit card brands. The standards aim at protecting all card holders and impose on all organizations (be it online or offline) who anyhow deal with credit cards. Usually these are companies like payment processors (e.g., PayPal, Stripe, Authorize.net, etc), banks, e-commerce solutions which process credit cards.
If you sell or buy with Online store, you can be sure that all sensitive information is completely safe and secure.
For more details, please visit Customers’ data security.
How to show different store categories on different pages?
You may want to create your own navigation in the store so that each of your product categories resides on a separate page of your site. Online Shopping Cart plugin supports such a setup. Here is how you can achieve it.
1. Create a new page for each product category or select an existing one in WordPress Admin panel → Pages.
2. Open the page for editing and click the Add store button.
3. In the popup under the Store elements tab select the widgets you want to show on the page.
4. Switch to the Appearance tab and select the product category that will be displayed when the page loads from the Category shown by default drop-down.
5. Click Insert into page. Repeat the steps 1-5 for each category page you want to show.
How to display the store on the site homepage?
You may want your customers to see the online store and start shopping right when they open your website. This is how you can display your store on the front page of your WordPress site.
- In your WordPress Admin panel navigate to Settings → Reading.
- Check the option Static page for Front page displays setting.
- Select the online store page that should be displayed as a home page in the drop-down below and save the changes.
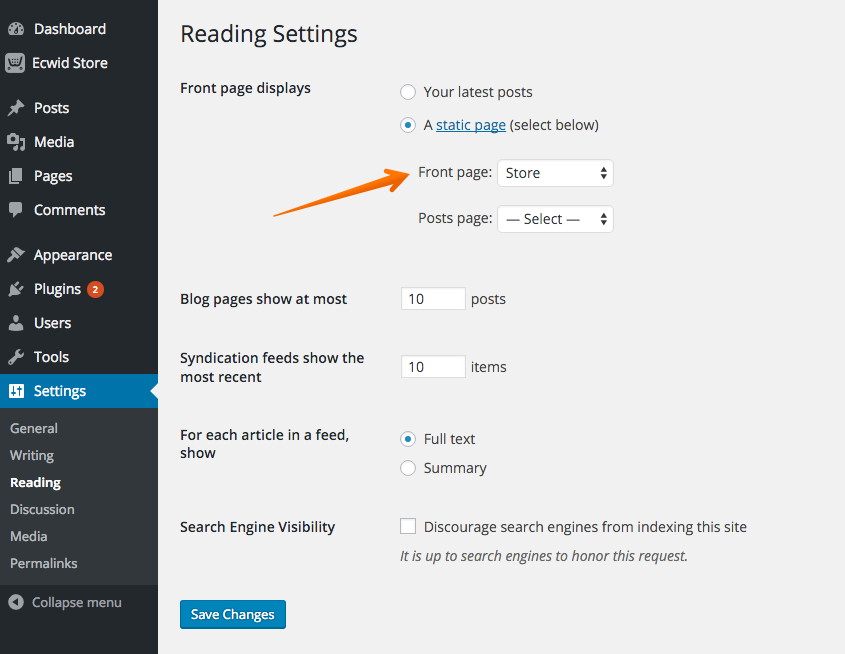
Now your online store will be displayed on the main page of your site.