Here's a step by step tutorial on how to get your store ready for selling. When you click on 'Dashboard you'll see '6 Step Wizard' to build out your store'. It's a good place to get start. Then continue with other important setting listed below.
Don't Have A Store Yet? Start Here
Step 1 Create Account -
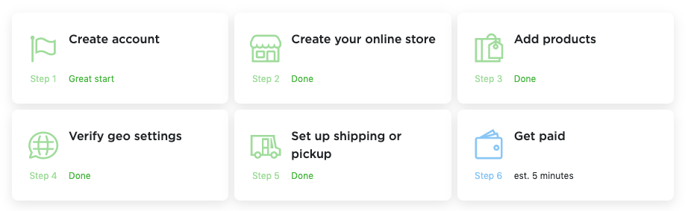
This step is complete when you get logins to your brand new store, from there complete out the remaining steps
Step 2 (Create Your Online Store)

– Please note that this step involves you setting your online store live/integrating your new store with your existing website and does not need to be completed immediately, you can come back to this step later -
- Navigate to Dashboard from the left side menu, from this screen click “Create your online store”
- The next screen will ask “Do you have a website or Facebook page?”, if you choose Yes, I have a website skip to Step 2a, if you choose No, I do not have a website skip to Step 2b below
Step 2a (Yes, I have a website)
- You will be prompted to choose which platform your website is built on – Wordpress, Joomla, Facebook & Other
- After selecting your website platform follow the instructions on screen, further details for each platform can be found below:
- Wordpress – click here
- Joomla – follow the steps shown on screen
- Facebook – click here
- Other Platform – follow the steps shown on screen
Step 2b (No, I do not have a website)
- You will be prompted to Specify your store address, for this you can enter your business name or preferred domain name e.g. mycompanyname.shopsettings.com. It is important to Once you have decided upon your store name click save
- Once saved, you will be brought to a screen showing your live store link, click proceed to next step
Step 3 (Add Products) –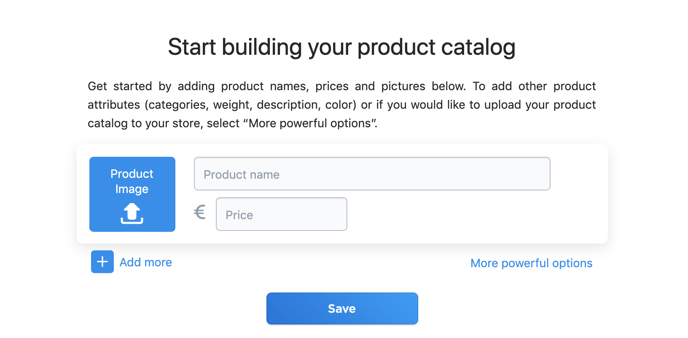
- Click on the Add Products box from the Dashboard
- On the next screen you will be prompted to “Start building your product catalog”, to do this:
- Click on the Product image to upload the image from your computer files (High quality imagery is very important for ecommerce store – it is crucial to display your product images in a neat, professional manner), further details on photographing your products can be found here
- Add the Product name
- Add the Product price
- You can also click the “More powerful options” link on this screen to allow you to add Product descriptions, SKU numbers, Weight and many more options (We highly recommend you choose this option, it is very important to add detailed, keyword rich descriptions to each of your products so search engines can display your ecommerce store for relevant search terms)
- For further details on adding & editing products click here
Step 4 (Verify Geo Settings)
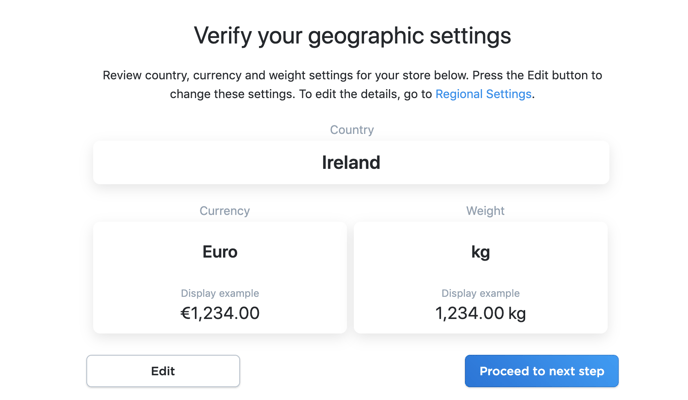
- Click on Verify Geo Settings from the Dashboard
- On the next screen click the Edit button to change your settings:
- Select your Country
- Select your Currency
- Select your Weight
-
- Store Name
- Company Name
- Phone Number
- Street Address
- Apartment, suite, unit, building etc
- City
- County
- Zip/Postal code
Click Save when you have finished
Step 5 (Set up Shipping or Pick up)
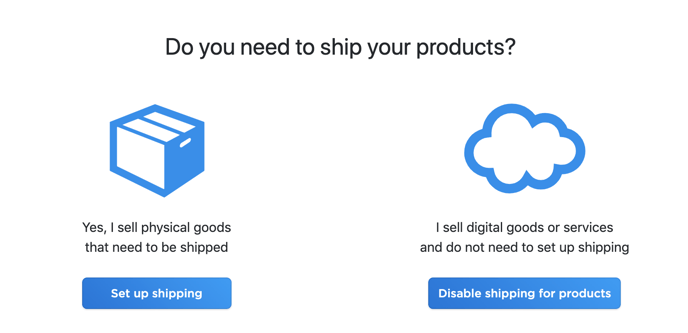
- Click on Set up shipping or pick up from the Dashboard
- You will be prompted to choose between Set up shipping or Disabling shipping for products (Click Set up shipping)
- From the next screen you can either set up custom flat rates (further details on custom flat rates can be found here) or you can click on the “advanced shipping options” link to view all possible shipping options (a detailed video guide for setting up shipping can be found here)
- You can also limit your shipping to certain counties within Ireland also (further details on shipping to certain states/counties can be found here)
Step 6 (Get Paid)
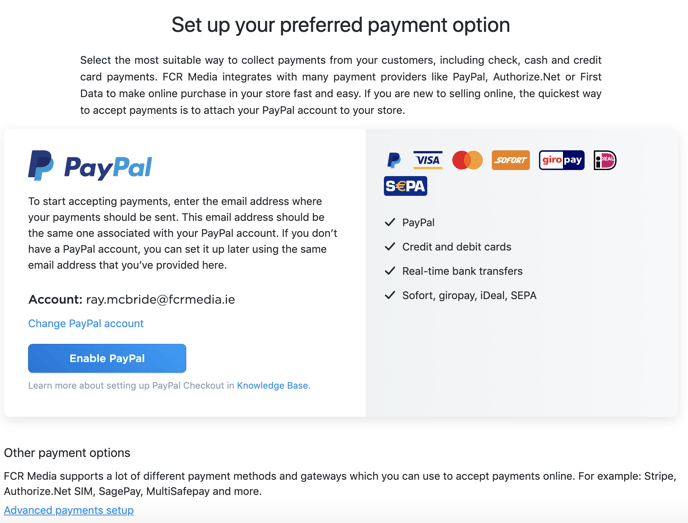
- Click on Get Paid from the Dashboard
- You will be brought to the “Set up your preferred payment option” screen, by default, Paypal will be prompted as your preferred payment option along with your store admin email as your Paypal Account email. You can change the Paypal Account email address by clicking the “Change Paypal account” link and clicking the “Enable Paypal” button when finished.
- If you wish to use another payment option instead of Paypal click on the Advanced payments setup link towards the bottom of the page, this will bring you to all of the payment options available
- We recommend using either Paypal, Stripe or both Paypal and Stripe as your payment gateway
- To add Paypal or Stripe follow the details on screen – you will be prompted to sign in to your Paypal/Stripe account in order to connect it to your store
- Further details on accepting payments online can be found here
Now that you've finished with the 6 step wizard it's time for further setting for store set up – (These steps are essential to fully completing your store set up)
Cart & Checkout
- From the left menu navigate to Settings -> General, then navigate to “Cart & Checkout” tab to edit any settings you wish to utilize
Legal Pages
- From the left menu navigate to Settings -> General, then navigate to “Legal Pages” tab to add your company Terms & Conditions documentation, (please note that we highly recommend that all of your policies are reviewed by your solicitor prior to selling online):
- About Us
- T&Cs Generator: https://www.termsandconditionsgenerator.com/#wizard
- Shipping Policy Template: https://docs.google.com/document/d/1VXBnJMnv7o42SZN5KRD7HLg628qdC3p99DIVD-hABOI/edit
- Return Policy Generator: https://termly.io/products/refund-return-policy-generator/
- Privacy Policy Generator: https://www.gdprprivacypolicy.net/
- Cookie Policy Generator: https://termly.io/products/cookie-consent-manager/
GDPR Opt-In
- Tick the checkbox for: Show “I agree with Terms & Conditions” checkbox at checkout
- Further details on legal pages can be found here
Advertising Tracking & Analytics
- From the left menu navigate to Settings -> General, then navigate to Tracking & Analytics tab to enter:
- Google Analytics ID (Read full Google Analytics article here)
- Facebook Pixel ID (Read full Facebook Pixel article here)
- Pinterest Tag
- Snapchat Pixel
VAT & Taxation
- From the left menu navigate to Settings -> General, then navigate to Settings -> Taxes (please note that we highly recommend that you consult your accountant on how to display your VAT/tax rate when selling your goods or services online)
- Full details on setting up taxes can be found here
Mail Notifications
- From the left menu navigate to Settings -> General, then navigate to Settings -> Mail and scroll to the bottom of the page to enter:
- Mail address that will receive notifications (if you need to alter this to a different email than the store was created with)
- Company logo
- From the left menu navigate to Settings -> General, then navigate to Settings -> Product Filters and click to enable
Creating your Storefront Design & Content
- Navigate to Website from the left menu (Full details on your instant site can be found here)
- To edit your storefront design read the full article
- To edit your storefront content read the full article
Adding Product Categories to your Store
- Navigate to Catalog -> Categories
- Click Add Root Category button & enter the category details – Category name, Category Image and Description
- To add sub categories select the root category from the left menu then click Add subcategory
- Further details on Categories and Sub Categories can be found here
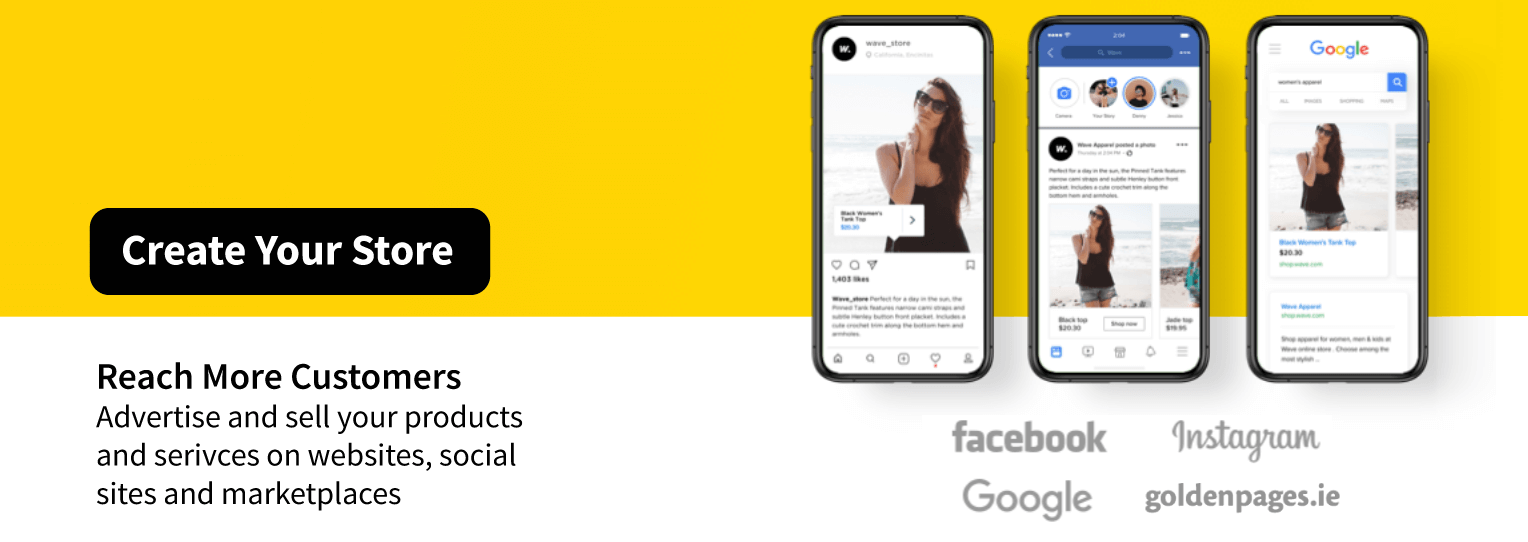
Selling Products on Facebook
- Navigate to Sell on Facebook
- Connect your store by clicking Connect Facebook Page button, follow these guidelines to connect your store correctly
- Once your store is connected to your Facebook account you will need to sync the products within your store to your Facebook page, follow these guideline to sync your product on Facebook
- We have a full list of Selling on Facebook FAQs which can be found here
Selling Products on Instagram
- You can also sell your products on Instagram by tagging them on your Instagram posts, follow these guidelines to connect and sell your products on Instagram